Single server with containers
A single server installation is being considered a non-production installation. For a production installation some kind of orchestration should be applied. A single server installation of FOLIO is useful for demo and testing purposes.
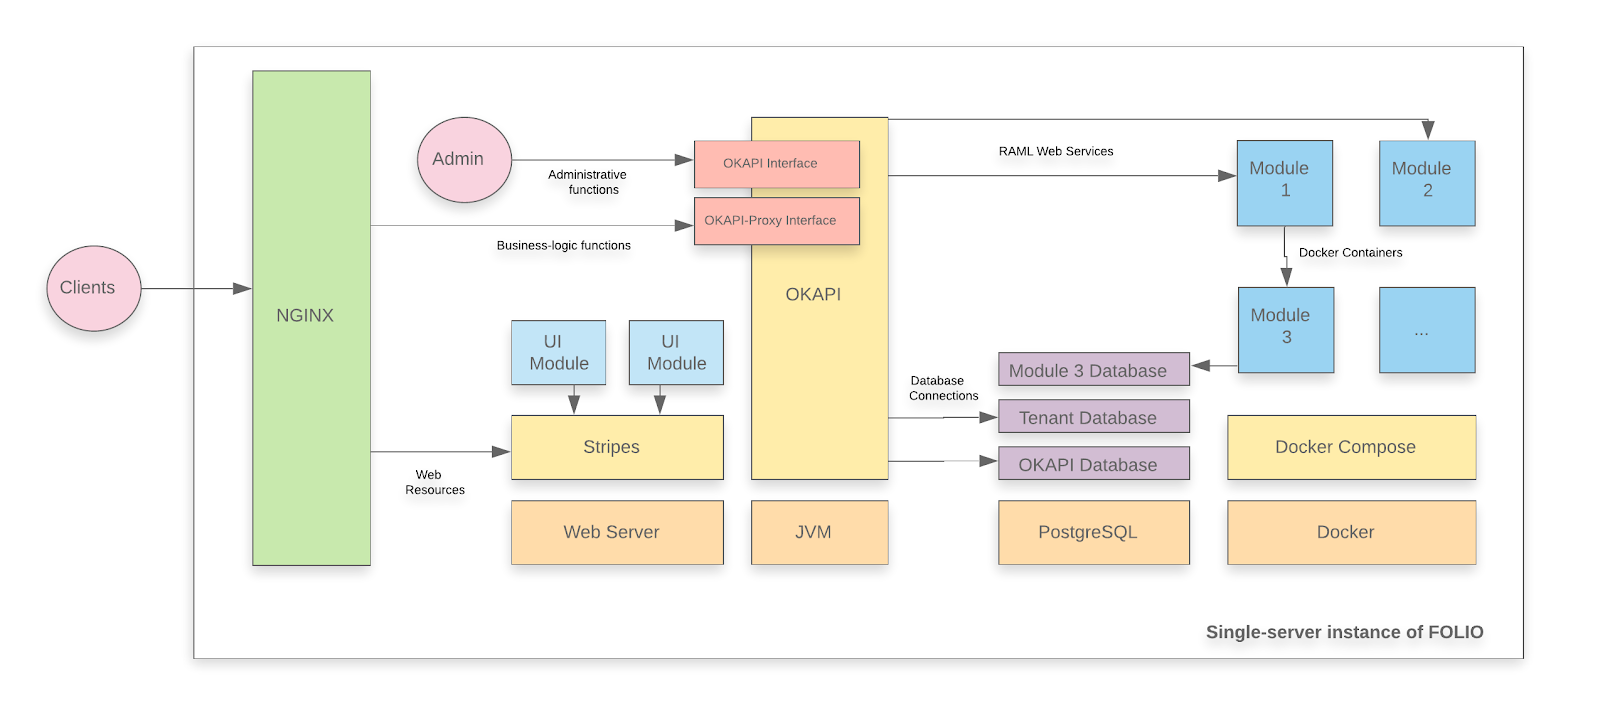
A FOLIO instance is divided into two main components. The first component is Okapi, the gateway. The second component is the UI layer which is called Stripes. The single server with containers installation method will install both.
Changes in the documentation
There are some changes in the idea of this documentation as compared to the documentations for previous releases (cf. Juniper or Iris documentations).
- This is a documentation for an upgrade of your FOLIO system. It assumes that you have already successfully installed Juniper (GA or a Juniper hotfix release) and now want to upgrade your system to Kiwi. If you are deploying FOLIO for the first time, or if you want to start with a fresh installation for whatever reasons, go to the Juniper single server documentation and come back here when you have installed Juniper.
- This documentation assumes that you have installed the platform-complete distribution and want to upgrade the modules of that distribution. Previous release documentations have been written for the more concise “platform-core” distribution. The platform-core distribution is not being supported, anymore.
System requirements
Software requirements
| Requirement | Recommended Version |
|---|---|
| Operating system | Ubuntu 20.04.02 LTS (Focal Fossa) 64-bits |
| FOLIO system | Juniper (R2-2021) |
Hardware requirements
| Requirement | FOLIO Extended Apps |
|---|---|
| RAM | 40GB |
| CPU | 8 |
| HD | 350 GB SSD |
I. Before the Upgrade
First do Ubuntu Updates & Upgrades
sudo apt-get update
sudo apt-get upgrade
sudo reboot
Check if all Services have been restarted after reboot: Okapi, postgres, docker, the docker containers (do: docker ps –all | more ). Stripes and nginx (you have started these in one container if you have followed the Juniper docs. Re-start this container).
The following actions in this section have been taken from the Kiwi Release Notes. There might be more actions that you might need to take for the upgrade of your FOLIO installation. If you are unsure what other steps you might need to take, study the Release Notes.
i. Change all duplicate item barcodes
Item barcode is unique now. Duplicate item barcodes fail the upgrade. Before upgrade: Change all duplicate item barcodes. Find them with this SQL:
pslq folio
SET search_path TO diku_mod_inventory_storage;
SELECT lower(jsonb->>'barcode')
FROM item
GROUP BY 1
HAVING count(*) > 1;
 lower
-------
(0 rows)
Change “diku” to the name of your tenant. Use Inventory Item Barcode search to edit the duplicate barcode.
ii. Change all holdings sources to FOLIO
Holdings created by a MARC Bib, not a MARC Holdings, showed the source = MARC. The behavior was changed to show source = FOLIO for such holdings. Database tables might contain holdings records with incorrect source value. See here MODSOURMAN-627 - Script for retrieving holding by specific conditions. Log in to your postgres database (on linux console, type “psql -U folio folio”) and select the Holdings where source name is not FOLIO or MARC :
SET search_path TO diku_mod_inventory_storage;
SELECT *
FROM holdings_record
WHERE holdings_record.jsonb ->> 'sourceId' = (
  SELECT id::text
  FROM holdings_records_source
  WHERE holdings_records_source.jsonb ->> 'name' != 'FOLIO' AND
    holdings_records_source.jsonb ->> 'name' != 'MARC');
(0 rows)

(END)
Replace ${tenant} by the name of your tenant. On a standard (test or demo) install, the tenant is “diku”. If the holdings source is anything other than FOLIO or MARC (e.g. -), then change it to FOLIO.
iii. Install Elasticsearch
If you have not already done so in your Juniper Install (it was optional there) install Elasticsearch now in your running Juniper instance. Follow this guide to install a 3-node Elasticsearch cluster on a Single Server: Installation of Elasticsearch. This will also install mod-search and the frontend modules folio_inventory-es and folio_search in Juniper.
iv.Install a minIO-Server
If you want to use Data Export, you either have to use Amazon S3 or a minIO server.
So, for anyone who plans to use MinIO server instead of Amazon S3:
External storage for generated MARC records should be configured to MinIO server by changing ENV variable AWS_URL.
Installation of a MinIO server is not being covered in this documentation. Refer to: MinIO Deployment and Management , Deploy MinIO Standalone .
v. More preparatory steps
There might be more preparatory steps that you need to take for your installation. If you are unsure what other steps you might need to take, study the Kiwi Release Notes.
II. Main Processing: Upgrade Juniper => Kiwi
This documentation assumes that you have Juniper Hotfix#3 running. Upgrade procedures for other Hotfixes or the GA Release might vary slightly. In particular, if this documentation refers to Juniper Release module versions, check if you have exactly that version running and if not, use the version that you had deployed.
II.i. Upgrade the Okapi Version / Restart Okapi
Install and configure Okapi
This needs to be done first, otherwise Okapi can not pull the new modules.
Read the Okapi Release Version from the platform-complete/install.json file.
- Clone the repository, change into that directory:
git clone https://github.com/folio-org/platform-complete
cd platform-complete
git fetch
There is a new Branch R3-2021-hotfix-2. We will deploy this version. Check out this Branch. Stash local changes. This should only pertain to stripes.config.js . Discard any changes which you might have made in Juniper on install.json etc.:
git restore install.json
git restore okapi-install.json
git restore stripes-install.json
git restore package.json

git stash save
git checkout master
git pull
git checkout R3-2021-hotfix-2
git stash pop
Read the R3 Okapi version from install.json: okapi-4.11.1
Fetch Okapi as a Debian package from repository.folio.org . Import the FOLIO signing key, add the FOLIO apt repository, install okapi (of this release):
wget --quiet -O - https://repository.folio.org/packages/debian/folio-apt-archive-key.asc | sudo apt-key add -
sudo add-apt-repository "deb https://repository.folio.org/packages/ubuntu focal/"
sudo apt-get update
sudo apt-get -y --allow-change-held-packages install okapi=4.11.1-1
Start Okapi in cluster mode
I install Okapi in cluster mode, because this is the appropriate way to install it in a production environment (although it is being done on a single server here, this procedure could also be applied to a multi-server environment). Strictly speaking, on a single server, it is not necessary to deploy Okapi in cluster mode. So you might want to stay with the default role “dev”, instead of “cluster”.
Change the port range in okapi.conf . Compared to Juniper, this needs to be done now, because Elasticsearch will occupy ports 9200 and 9300 (or is already occupying them) :
vim /etc/folio/okapi/okapi.conf
# then change the following lines to:
      - role="cluster"
      - cluster_config="-hazelcast-config-file /etc/folio/okapi/hazelcast.xml"
      - cluster_port="9001"
      - port_start="9301"
      - port_end="9520"
      - host="10.X.X.X"  # change to your host's IP address
      - nodename="10.X.X.X"
You can find out the node name that Okapi uses like this: curl -X GET http://localhost:9130/_/discovery/nodes . You have to use that value if you deploy Okapi in cluster mode. Not your host name and not “localhost”.
Edit interface and members in hazelcast.xml (if you deploy Okapi in cluster mode). If you run Okapi on a single server, this is your local IP address.
vim /etc/folio/okapi/hazelcast.xml
...
<tcp-ip enabled="true">
                <interface>10.X.X.X</interface>  # replace by your host's IP address
                <member-list>
                    <member>10.X.X.X</member>    # replace by your host's IP address
                </member-list>
</tcp-ip>
Send new Environment Variables for Hazelcast to Okapi (in case you haven’t been using Hazelcast so far):
curl -w '\n' -D - -X POST -H "Content-Type: application/json" -d "{\"name\":\"OKAPI_CLUSTERHOST\",\"value\":\"10.X.X.X\"}" http://localhost:9130/_/env
curl -w '\n' -D - -X POST -H "Content-Type: application/json" -d "{\"name\":\"HAZELCAST_IP\",\"value\":\"10.X.X.X\"}" http://localhost:9130/_/env
curl -w '\n' -D - -X POST -H "Content-Type: application/json" -d "{\"name\":\"HAZELCAST_PORT\",\"value\":\"5701\"}" http://localhost:9130/_/env
curl -w '\n' -D - -X POST -H "Content-Type: application/json" -d "{\"name\":\"HAZELCAST_FILE\",\"value\":\"/etc/folio/okapi/hazelcast.xml\"}" http://localhost:9130/_/env
Restart Okapi:
sudo systemctl daemon-reload
sudo systemctl restart okapi.service
Follow /var/log/folio/okapi/okapi.log . You should read something like this:
INFO DeploymentManager shutdown
...
Now Okapi will re-start your modules. Follow the okapi.log. It will run for 2 or 3 minutes. Check if all modules are running:
docker ps --all | grep "mod-" | wc
  62
Retrieve the list of modules which are now being enabled for your tenant (just for your information):
curl -w '\n' -XGET http://localhost:9130/_/proxy/tenants/diku/modules
...
}, {
  "id" : "okapi-4.11.1"
} ]
You should see 9 Edge modules (if you have started from Juniper HF#3; if you have started from Juniper-GA, you will see only 8 Edge modules), 52 Frontend modules (folio_*), 62 Backend modules (mod-*) (These are the modules of Juniper, platform-complete) + the Kiwi-Version of Okapi (4.11.1).
II.ii. Pull module descriptors from the central registry
A module descriptor declares the basic module metadata (id, name, etc.), specifies the module’s dependencies on other modules (interface identifiers to be precise), and reports all “provided” interfaces. As part of the continuous integration process, each Module Descriptor is published to the FOLIO Registry at https://folio-registry.dev.folio.org.
curl -w '\n' -D - -X POST -H "Content-type: application/json" \
  -d { "urls": [ "https://folio-registry.dev.folio.org" ]  http://localhost:9130/_/proxy/pull/modules
Okapi log should show something like
 INFO  ProxyContext         283828/proxy REQ 127.0.0.1:51424 supertenant POST /_/proxy/pull/modules  okapi-4.11.1
 INFO  PullManager          Remote registry at https://folio-registry.dev.folio.org is version 4.11.1
 INFO  PullManager          pull smart
  ...
 INFO  PullManager          pull: 3466 MDs to insert
 INFO  ProxyContext         283828/proxy RES 200 93096323us okapi-4.11.1 /_/proxy/pull/modules
II.iii. Deploy a compatible FOLIO backend
- Post data source information to the Okapi environment for use by deployed modules
curl -w '\n' -D - -X POST -H "Content-Type: application/json" -d "{\"name\":\"ELASTICSEARCH_HOST\",\"value\":\"10.X.X.X\"}" http://localhost:9130/_/env;
curl -w '\n' -D - -X POST -H "Content-Type: application/json" -d "{\"name\":\"ELASTICSEARCH_URL\",\"value\":\"http://10.X.X.X:9200\"}" http://localhost:9130/_/env;
curl -w '\n' -D - -X POST -H "Content-Type: application/json" -d "{\"name\":\"ELASTICSEARCH_USERNAME\",\"value\":\"elastic\"}" http://localhost:9130/_/env;
curl -w '\n' -D - -X POST -H "Content-Type: application/json" -d "{\"name\":\"ELASTICSEARCH_PASSWORD\",\"value\":\"s3cret\"}" http://localhost:9130/_/env;  # Use the password that you have chosen for Elasticsearch above !!
curl -w '\n' -D - -X POST -H "Content-Type: application/json" -d "{\"name\":\"INITIAL_LANGUAGES\",\"value\":\"eng, ger, swe\"}" http://localhost:9130/_/env;  # replace by the language codes for the languages that you need to support
Change 10.X.X.X to your local IP address. You can choose up to five INITIAL_LANGUAGES. To find out the language codes, view here mod-search: multi language search support .
The Okapi environment should now look something like this:
 curl -X GET http://localhost:9130/_/env
[ {
  "name" : "DB_DATABASE",
  "value" : "folio"
}, {
  "name" : "DB_HOST",
  "value" : "10.X.X.X"
}, {
  "name" : "DB_PASSWORD",
  "value" : "folio123"
}, {
  "name" : "DB_PORT",
  "value" : "5432"
}, {
  "name" : "DB_USERNAME",
  "value" : "folio"
}, {
  "name" : "ELASTICSEARCH_HOST",
  "value" : "10.X.X.X"
}, {
  "name" : "ELASTICSEARCH_PASSWORD",
  "value" : "s3cret"
}, {
  "name" : "ELASTICSEARCH_URL",
  "value" : "http://10.X.X.X:9200"
}, {
  "name" : "ELASTICSEARCH_USERNAME",
  "value" : "elastic"
}, {
  "name" : "HAZELCAST_FILE",
  "value" : "/etc/folio/okapi/hazelcast.xml"
}, {
  "name" : "HAZELCAST_IP",
  "value" : "10.X.X.X"
}, {
  "name" : "HAZELCAST_PORT",
  "value" : "5701"
}, {
  "name" : "INITIAL_LANGUAGES",
  "value" : "eng, ger, swe"
}, {
  "name" : "KAFKA_HOST",
  "value" : "10.X.X.X"
}, {
  "name" : "KAFKA_PORT",
  "value" : "9092"
}, {
  "name" : "OKAPI_CLUSTERHOST",
  "value" : "10.X.X.X"
}, {
  "name" : "OKAPI_URL",
  "value" : "http://10.X.X.X:9130"
}, {
  "name" : "SYSTEM_USER_PASSWORD",
  "value" : "pub-sub"
} ]
If you chose a different SYSTEM_USER_PASSWORD than the default (which you should do on a production system), then you will have to change the password of the user “pub-sub” in the system to the same value. Change the password of the user pub-sub via Settings - Passwords menu. Attention: If you change the password of the User pub-sub, then you will have to undeploy and re-deploy mod-pubsub ! Just upgrading mod-pubsub will not be enough. Otherwise, the cirulation log won’t work.
- Deploy the backend modules
Sidestep: Look, how many containers are running already now:
sudo docker ps | grep -v “^CONTAINER” | wc -l
68 containers are running:
- 62 Backend Modules of R2-2021
- Stripes with nginx
- 3 Nodes Elasticsearch
- Kafka & Zookeeper
2.1. Upgrade and enable mod-pubsub
First do a simulation run:
curl -w '\n' -D - -X POST -H "Content-type: application/json" -d '[ { "id" : "mod-pubsub-2.4.3", "action" : "enable" } ]' http://localhost:9130/_/proxy/tenants/diku/install?simulate=true
The deploy the module and enable it for the tenant (replace “diku” by the name of your tenant):
curl -w '\n' -D - -X POST -H "Content-type: application/json" -d '[ { "id" : "mod-pubsub-2.4.3", "action" : "enable" } ]' http://localhost:9130/_/proxy/tenants/diku/install?deploy=true\&preRelease=false\&tenantParameters=loadReference%3Dtrue
HTTP/1.1 200 OK
The old module instance, mod-pubsub-2.3.3, has been automatically undeployed by this operation.
2.2 Deploy all the other backend modules
Remove mod-pubsub-2.4.3 from the list ~/platform-complete/okapi-install.json because it has already been deployed.
Deploy all backend modules with this single script deploy-all-backend-modules.sh . You will also need this script deploy-backend-module.sh :
This will download all the necessary container images for the backend modules from Docker Hub and deploy them as containers to the local system :
./deploy-all-backend-modules.sh ~/platform-complete/okapi-install.json <YOUR_IP_ADDRESS>
This script will run for approx. 15 minutes. It will spin up one Docker container for each backend module using Okapi’s /discovery/modules endpoint.
You can follow the progress on the terminal screen and/or in /var/lib/folio/okapi/okapi.log .
Now the R3 (Kiwi) backend modules have been deployed, but have not yet been enabled for your tenant.
In addition, the R2 (Juniper) containers are still running on your system. The latter are enabled. This means that, right now, the system is still in the state “R2-2021 (Juniper)”, except for Okapi (but the Okapi is downward compatible to R2) and mod-pubsub.
There are 61 backend modules of R2 (all, except for mod-pubsub) and 65 backend modules of R3 running as containers on your system. Check this by typing
docker ps --all | grep "mod-" | wc
    126
Side Remark: Three of the backend modules have been deployed twice in the same version, because for those backend modules, the R2 version is the same as the R3 version. These modules are:
  mod-service-interaction:1.0.0
  mod-graphql:1.9.0
  mod-z3950-2.4.0
.
II.iv. Enable the modules for your tenant
Remove mod-pubsub-2.4.3 and okapi from ~/platform-complete/install.json because they have already been enabled.
Enable frontend and backend modules in a single post. But first, do a simulate run. Don’t deploy the modules because they have already been deployed (use the parameter deploy=false). Load reference data of the modules, but no sample data. If you don’t load reference data for the new modules, you might not be able to utilize the modules properly.
First, do a simulate run (replace “diku” by the name of your tenant):
curl -w '\n' -D - -X POST -H "Content-type: application/json" -d @/usr/folio/platform-complete/install.json http://localhost:9130/_/proxy/tenants/diku/install?simulate=true\&preRelease=false
Then, do enable the modules:
curl -w '\n' -D - -X POST -H "Content-type: application/json" -d @/usr/folio/platform-complete/install.json http://localhost:9130/_/proxy/tenants/diku/install?deploy=false\&preRelease=false\&tenantParameters=loadReference%3Dtrue
...
HTTP/1.1 100 Continue

HTTP/1.1 200 OK
Side Remark: folio_inventory-es-6.4.0, a frontend module POC for using mod-inventory with Elasticsearch, has been kept and even updated. But in Kiwi, you won`t need it, because there, mod-inventory and folio_inventory work with Elasticsearch, anyway. Therefore, you might want to disable folio_inventory-es-6.4.0.
Just for your information: Look, how many backend modules have now been deployed on your server:
curl -w '\n' -D - http://localhost:9130/_/discovery/modules | grep srvcId | wc
 128
The number 128 includes 5 Edge modules. Another important information: Get a list of modules (frontend + backend) that have now been enabled for your tenant:
curl -w '\n' -XGET http://localhost:9130/_/proxy/tenants/diku/modules | grep id | wc
  132
This number is the sum of the following:
- 56 Frontend modules (including folio_inventory-es)
- 10 Edge modules
- 65 Backend modules (R3-2021)
- 1 Okapi module (4.11.1)
These are all R3 (Kiwi) modules.
The backend of the new tenant is ready. Now, you have to set up a new Stripes instance for the frontend of the tenant.
II.v. Build an R3-2021 FOLIO Stripes platform
Install Stripes and nginx in a Docker container. Use the docker file of platform-complete. Change OKAPI_URL to your server name or SAN - usually the name for which you have an SSL certificate. Change the TENANT_ID to your tenant ID:
cd ~/platform-core
edit docker/Dockerfile
    ARG OKAPI_URL=http(s)://<YOUR_DOMAIN_NAME>/okapi
    ARG TENANT_ID=diku # Or change to your tenant's name
Use https if possible, i.e. use an SSL certificate. <YOUR_DOMAIN_NAME> should then be the fully qualified domain name (FQDN) for which your certificate is valid, or a server alias name (SAN) which applies to your certificate. If using http, it is your server name (host name plus domain). The subpath /okapi of your domain name will be redirected to port 9130 below, in your nginx configuration.
Configure webserver to serve Stripes webpack: Edit docker/nginx.conf. Place your local server name – this is not necessarily equal to the server name for which you have an SSL certificate ! – in server_name and use your IP address in proxy_pass :
  edit docker/nginx.conf
server {
  listen 80;
  server_name <YOUR_SERVER_NAME>;
  charset utf-8;
  access_log  /var/log/nginx/host.access.log  combined;

  # front-end requests:
  # Serve index.html for any request not found
  location / {
    # Set path
    root        /usr/share/nginx/html;
    index       index.html index.htm;
    include mime.types;
    types {
      text/plain lock;
    }
    try_files $uri /index.html;
  }

  # back-end requests:
  location /okapi {
    rewrite ^/okapi/(.*) /$1 break;
    proxy_pass http://<YOUR_IP_ADDRESS>:9130/;
  }
}
<YOUR_SERVER_NAME> should be the real name of your server in your network. <YOUR_SERVER_NAME> should consist of host name plus domain name, e.g. myserv.mydomain.edu.
Edit the url and tenant in stripes.config.js. The url will be requested by a FOLIO client, thus a browser. Make sure that you use the public IP or domain of your server. Use http only if you want to access your FOLIO installation only from within your network.
  edit stripes.config.js
      okapi: { 'url':'http(s)://<YOUR_DOMAIN_NAME>/okapi', 'tenant':'diku' },
You might also edit branding in stripes.config.js, e.g. add your own logo and favicon as desired. Edit these lines:
  branding: {
    logo: {
      src: './tenant-assets/mybib.gif',
      alt: 'My Folio Library',
    },
    favicon: {
      src: './tenant-assets/mybib_icon.gif'
    },
  }
Finally, build the docker container which will contain Stripes and nginx :
  sudo su
  docker build -f docker/Dockerfile --build-arg OKAPI_URL=http(s)://<YOUR_DOMAIN_NAME>/okapi --build-arg TENANT_ID=diku -t stripes .
Sending build context to Docker daemon  1.138GB
Step 1/19 : FROM node:15-alpine as stripes_build
...
Step 19/19 : ENTRYPOINT ["/usr/bin/entrypoint.sh"]
 ---> Running in a47dce4e3b3e
Removing intermediate container a47dce4e3b3e
 ---> 48a532266f21
Successfully built 48a532266f21
Successfully tagged stripes:latest
This will run for approximately 15 minutes.
Stop the old Stripes container: docker stop
Completely free your port 80. Look if something is still running there: e.g., do
netstat -taupn | grep 80
If there should be something still running on port 80, kill these processes.
Start the stripes container:
Redirect port 80 from the outside to port 80 of the docker container:
nohup docker run -d -p 80:80 stripes
Log in to your frontend: E.g., go to http://<YOUR_HOST_NAME>/ in your browser.
-
Can you see the R3 modules in Settings - Installation details ?
-
Do you see the right okapi version, 4.11.1-1 ?
-
Does everything look good ?
If so, remove the old stripes container: docker rm <container id of your old stripes container> .
II.vi. Cleanup
Clean up. Undeploy all unused containers.
In general, all R2 modules have to be removed now. But some care has to be taken.
a) If you have more than one tenant on your server, some tenants may still need R2 modules ! Don’t delete those R2 modules. Check also for your supertenant; did you enable anything else than okapi for it ?
b) Sometimes, R2 versions are the same as R3 versions. In this case, you will have two containers of the same module version running on your system (because we have deployed it twice). You might just leave it as is. Okapi will do some kind of round robin between the two module instances.
But if you decide to delete (=undeploy) one of those containers from Okapi’s discovery, you should disable and re-enable the module for your tenants, afterwards.
Create a list of containers which are in your okapi discovery
curl -w '\n' -XGET http://localhost:9130/_/discovery/modules | jq '.[] | .srvcId + "/" + .instId' > dockerps.sh
sort dockerps.sh > dockerps.todelete.sh
This list should still contain the module versions of the old release:
=> backend modules (mod-*) of the old release (61 modules) + backend modules of the new release (62 = 65 - 3 which are the same in the old release) + 5 Edge modules =128 modules.
Of those 128 modules, 58 have now to be undeployed: Undeploy all R2 modules (which are still running), except for at least one instance of mod-service-interaction:1.0.0, mod-graphql:1.9.0 and mod-z3950-2.4.0 (because they are on the same version in R2 and R3).
If you have deployed mod-service-interaction:1.0.0, mod-graphql:1.9.0 and mod-z3950-2.4.0 twice and want to undeploy one instance of them now, you will need to undeploy 61 modules.
Compare the list with list of R3 modules
Compare the list dockerps.todelete.sh with the list ~/platform-complete/okapi-install.sh (the R3 backend modules). First, sort this list:
sort okapi-install.json > okapi-install.json.sorted
Now, throw out all modules which are in okapi-install.json.sorted out of the list dockerps.todelete.sh . This should leave you with a list of 58 (or 61) modules which are to be deleted now. If you decided to delete one of the instances of those modules which have been deployed twice, you should now have a list of 61 modules.
Edit dockerps.todelete.sh once again to make each line look like this (e.g. for mod-agreements; i.e. prepend “curl -w ‘\n’ -D - -XDELETE http://localhost:9130/_/discovery/modules/” to each line) :
curl -w '\n' -D - -XDELETE http://localhost:9130/_/discovery/modules/mod-agreements-4.1.1/<instId>
Finally, remove all unused modules
Add a line #!/bin/bash at the top of your delete script, make the script executable and then execute your delete script:
./dockerps.todelete.sh
This will be acknowledged by an “HTTP/1.1 204 No Content” for each module.
Now, finally once again get a list of the deployed backend modules:
curl -w '\n' -D - http://localhost:9130/_/discovery/modules | grep srvcId | wc
65
This should only contain the module versions of the new release now : 65 backend modules of R3-2021. Compare this with the number of your running docker containers:
docker ps --all | grep "mod-" | wc
  65
docker ps --all | wc
  72
The following containers are running on your system, but do not contain backend modules:
Stripes
3x Elasticsearch
Kafka
Zookeper
In sum, these are 6 containers without backend modules. Also subtract the header line (of “docker ps”), and you will arrive at 72 - 7 = 65 containers with backend modules (the figure of the first “wc”).
C’EST FINI !
Aftermath: If you have undeployed one instance of mod-service-interaction:1.0.0, mod-graphql:1.9.0 and mod-z3950-2.4.0 each, do this now: Disable those modules for your tenant and re-enable them. This will prevent Okapi form still trying to round robin with the deleted module instance. You also need to disable folio_dashboard-2.0.0 because it depends on mod-service-interaction-1.0.0 : Disable the modules:
curl -w '\n' -D - -X POST -H "Content-type: application/json" -d '[ { "id": "mod-graphql-1.9.0", "action": "disable" }, { "id": "mod-z3950-2.4.0", "action": "disable" }, { "id": "mod-service-interaction-1.0.0", "action": "disable" }, { "id": "folio_dashboard-2.0.0", "action": "disable" } ]' http://localhost:9130/_/proxy/tenants/diku/install?simulate=true\&preRelease=false
curl -w '\n' -D - -X POST -H "Content-type: application/json" -d '[ { "id": "mod-graphql-1.9.0", "action": "disable" }, { "id": "mod-z3950-2.4.0", "action": "disable" }, { "id": "mod-service-interaction-1.0.0", "action": "disable" }, { "id": "folio_dashboard-2.0.0", "action": "disable" } ]' http://localhost:9130/_/proxy/tenants/diku/install?deploy=false\&preRelease=false\&tenantParameters=loadReference%3Dtrue%2CloadSample%3Dfalse
Re-enable the modules:
curl -w '\n' -D - -X POST -H "Content-type: application/json" -d '[ { "id": "mod-graphql-1.9.0", "action": "enable" }, { "id": "mod-z3950-2.4.0", "action": "enable" }, { "id": "mod-service-interaction-1.0.0", "action": "enable" }, { "id": "folio_dashboard-2.0.0", "action": "enable" } ]' http://localhost:9130/_/proxy/tenants/diku/install?simulate=true\&preRelease=false
curl -w '\n' -D - -X POST -H "Content-type: application/json" -d '[ { "id": "mod-graphql-1.9.0", "action": "enable" }, { "id": "mod-z3950-2.4.0", "action": "enable" }, { "id": "mod-service-interaction-1.0.0", "action": "enable" }, { "id": "folio_dashboard-2.0.0", "action": "enable" } ]' http://localhost:9130/_/proxy/tenants/diku/install?deploy=false\&preRelease=false\&tenantParameters=loadReference%3Dtrue%2CloadSample%3Dfalse